TJCTF 2025 | 7/8 Forensics
Future weight: 63.09
Rating weight: 51.29
Event organizers: tjcsc
forensics/hidden-message
An easy stego challenge where we apply some basics tools to obtain hidden information, in this case is used zsteg to analyze LSB layers and color channel anomalies, extracting hidden data from PNG and BMP images.
First of all, identify the validity of the format with file and later execute zstego.
$> file suspicious.png
suspicious.png: PNG image data, 100 x 100, 8-bit/color RGB, non-interlaced

$> zsteg suspicious.png
imagedata           .. file: Targa image data - Map 1024 x 1023 x 1 +256 +259 "\002\003"
b1,rgb,lsb,xy       .. text: "tjctf{steganography_is_fun}###END###"
b2,g,lsb,xy         .. text: ["U" repeated 25 times]
b2,g,msb,xy         .. text: ["U" repeated 25 times]
b4,g,lsb,xy         .. file: 0420 Alliant virtual executable not stripped
b4,g,msb,xy         .. text: ["D" repeated 50 times]
b4,bgr,lsb,xy       .. file: 0421 Alliant compact executable
forensics/deep-layers
For this easy challenge zsteg will be reused to detect both, embedded file and base64 text in the image:
$> file chall.png
chall.png: PNG image data, 1 x 1, 8-bit/color RGBA, non-interlaced

$> zsteg chall.png
[?] 251 bytes of extra data after image end (IEND), offset = 0x77
extradata:0         .. file: Zip archive data, at least v1.0 to extract, compression method=store
    00000000: 50 4b 03 04 0a 00 09 00  00 00 41 92 c5 5a 24 fa  |PK........A..Z$.|
    00000010: 3e e2 43 00 00 00 37 00  00 00 09 00 1c 00 73 65  |>.C...7.......se|
    00000020: 63 72 65 74 2e 67 7a 55  54 09 00 03 99 17 42 68  |cret.gzUT.....Bh|
    00000030: 99 17 42 68 75 78 0b 00  01 04 f6 01 00 00 04 14  |..Bhux..........|
    00000040: 00 00 00 df 0a 4b fa 61  88 12 34 ea 3d 36 f6 0a  |.....K.a..4.=6..|
    00000050: 47 59 85 43 55 5c 64 ca  b6 8f 42 68 0f 7c 94 61  |GY.CU\d...Bh.|.a|
    00000060: 1a 1f 88 38 48 bf f5 96  1b 45 3a 56 dd 7f 1d 44  |...8H....E:V...D|
    00000070: 69 54 81 8e 7a f3 94 f2  f0 37 86 37 22 d8 a6 b0  |iT..z....7.7"...|
    00000080: 13 f9 fa 09 61 0a 50 4b  07 08 24 fa 3e e2 43 00  |....a.PK..$.>.C.|
    00000090: 00 00 37 00 00 00 50 4b  01 02 1e 03 0a 00 09 00  |..7...PK........|
    000000a0: 00 00 41 92 c5 5a 24 fa  3e e2 43 00 00 00 37 00  |..A..Z$.>.C...7.|
    000000b0: 00 00 09 00 18 00 00 00  00 00 00 00 00 00 a4 81  |................|
    000000c0: 00 00 00 00 73 65 63 72  65 74 2e 67 7a 55 54 05  |....secret.gzUT.|
    000000d0: 00 03 99 17 42 68 75 78  0b 00 01 04 f6 01 00 00  |....Bhux........|
    000000e0: 04 14 00 00 00 50 4b 05  06 00 00 00 00 01 00 01  |.....PK.........|
    000000f0: 00 4f 00 00 00 96 00 00  00 00 00                 |.O.........     |
meta Password       .. text: "cDBseWdsMHRwM3NzdzByZA=="
We could extract the gzip file with some tools such as binwalk, foremost or inclusive zsteg:
zsteg -E extradata:0 chall.png > hidden.zipDespite it, we can unzip it directly, before that, we base64 decode the “meta Password” section:
$> echo "cDBseWdsMHRwM3NzdzByZA==" | base64 -d
p0lygl0tp3ssw0rd
With 7z we decompress the content:
$> 7z x chall.png -pp0lygl0tp3ssw0rd

7-Zip [64] 16.02 : Copyright (c) 1999-2016 Igor Pavlov : 2016-05-21
p7zip Version 16.02 (locale=en_US.UTF-8,Utf16=on,HugeFiles=on,64 bits,8 CPUs Intel(R) Core(TM) i5-1035G1 CPU @ 1.00GHz (706E5),ASM,AES-NI)

Scanning the drive for archives:
1 file, 370 bytes (1 KiB)

Extracting archive: chall.png
--
Path = chall.png
Type = zip
Offset = 119
Physical Size = 251

Everything is Ok

Size:       55
Compressed: 370

$> ls secret.gz && gzip -d secret.gz && cat secret
secret.gz
tjctf{p0lygl0t_r3bb1t_h0l3}
forensics/footprint
We have given a .DS_Store file and they are asking for the flag within a file. Doing the typical strings command we donwon’t find nothing relevant:
$> strings .DS_Store -n7 | head
QIlocblob
AIlocblob
AIlocblob
AIlocblob
AIlocblob
QIlocblob
QIlocblob
AIlocblob
QIlocblob
gIlocblob
With a simple Google search, this github tool for MacOS Forensics is appeared: https://github.com/hanwenzhu/.DS_Store-parser, other tools are found but was for server, you could have hosted a webserver with python3, php, or whatever you want to use those tools, but the idea is to simplify the challenge as much as possible, that why we use this tool:
$> python3 parse.py ../.DS_Store
-FumtF3yx-kSP11OD8mFPA
        Icon location: x 175px, y 46px, 0xffffffffffff0000
0wnNJd_pKKNtfhG-HL8iJw
        Icon location: x 285px, y 46px, 0xffffffffffff0000
1VmhSaBo9ymK5dUhB3cPEQ
        Icon location: x 395px, y 46px, 0xffffffffffff0000
1zp7dw6eF3co0VaPDKhUag
        Icon location: x 505px, y 46px, 0xffffffffffff0000
27bCy1Bt-9nnLG4W8oxkNA
        Icon location: x 65px, y 270px, 0xffffffffffff0000
...
...
...
        Icon location: x 285px, y 1838px, 0xffffffffffff0000
Z3cpkGAUMlLgzQctzCo2Zg
        Icon location: x 395px, y 1838px, 0xffffffffffff0000
While using the tool we found a lot of files and icons, but not their content, there is when we tryied to decode in base64 the file names, with a simple bash scripting we get the cleartext:
python3 parse.py ../.DS_Store | grep -v "Icon location" | while read i; do echo "$i" | base64 -d 2>/dev/null | strings | tr -d '\n'; doneIt seems more complex than it is, if you don’t understand it, look at it in detail.
python3 parse.py ../.DS_Store | grep -v "Icon location" |
    while read i; do              \
        echo "$i"               | \
        base64 -d 2>/dev/null   | \
        strings                 | \
        tr -d '\n'                \
;done
The output will show the flag splitted in two:
Q/3fis_useful?} W+#gatjctf{ds_store_ {\T?L$i~J]{w5Haf@o=UE_}Ex I:P$C:)H9B !`SnwgLx@WrP~(,wf[bFlag: tjctf{ds_store_is_useful?}
forensics/album-cover
Starting with a scanning of the files given:
Albumcover.png
$> file albumcover.png && zsteg albumcover.png
albumcover.png: PNG image data, 444 x 441, 8-bit grayscale, non-interlaced
b1,r,lsb,xy         .. file: AIX core file fulldump
b2,r,msb,xy         .. text: "WV[U^UkU"
b4,r,lsb,xy         .. file: MPEG ADTS, AAC, v4 Main, 44.1 kHz, stereo+center+LFE
b4,rgb,lsb,xy       .. text: "\"\"\"\"\"\"\"!"
b4,rgb,msb,xy       .. text: ["w" repeated 9 times]
enc.py
import wave
from PIL import Image
import numpy as np
#sample_rate = 44100
with wave.open('flag.wav', 'rb') as w:
    frames = np.frombuffer(w.readframes(w.getnframes()), dtype=np.int16)
    print(w.getnframes())
    sampwidth = w.getsampwidth() # 2
    nchannels = w.getnchannels() # 1
    w.close()
arr = np.array(frames)
img = arr.reshape((441, 444))
img = (img + 32767) / 65535 * 255
img = img.astype(np.uint8)
img = Image.fromarray(img)
img = img.convert('L')
img.save('albumcover.png')
At first glance, it seems to be encode a wav file into a png, following a linear map, encoding each 16-bit knowing: $s \in [-32768, 32767]$ $$ \text{pixel} = \frac{s + 32767}{65535} \times 255 $$
If we invert it:
$$ s = \frac{\text{pixel}}{255} \times 65535 - 32767 $$
Now opening a new wav file in write mode, set mono, 16-bit (round s to the nearest integer) and 44.1 kHz, you will obtain the original wav:
import wave
import numpy as np
from PIL import Image

# --- Configuration: must match your original WAV ---
OUTPUT_WAV   = 'recovered.wav'
INPUT_PNG    = 'albumcover.png'
SAMPLE_RATE  = 44100      # Hz
N_CHANNELS   = 1
SAMPLE_WIDTH = 2          # bytes (16-bit)
IMG_WIDTH    = 444        # as in your encoder
IMG_HEIGHT   = 441        # as in your encoder
# -----------------------------------------------

# 1) Load the image and convert to a numpy array
img = Image.open(INPUT_PNG).convert('L')
arr8 = np.array(img, dtype=np.uint8)

# 2) Reverse the scaling:
#    original: img = (samples + 32767) / 65535 * 255
#    so: samples = img/255*65535 - 32767
arr16 = (arr8.astype(np.float32) / 255.0 * 65535.0) - 32767.0

# 3) Round and cast back to int16
samples = np.round(arr16).astype(np.int16)

# 4) Flatten to 1D PCM stream
pcm = samples.reshape(-1)

# 5) Write to a new WAV file
with wave.open(OUTPUT_WAV, 'wb') as w:
    w.setnchannels(N_CHANNELS)
    w.setsampwidth(SAMPLE_WIDTH)
    w.setframerate(SAMPLE_RATE)
    w.writeframes(pcm.tobytes())

print(f"Reconstructed WAV written to {OUTPUT_WAV} ({pcm.shape[0]} frames)")
Since the audio is unreadable, we open it in a visualizer like Sonic Visualizer, inside the Spectogram, we found the flag written:

forensics/packet-palette
Inside the pcap we can find a png embeded, with a fast visualization:
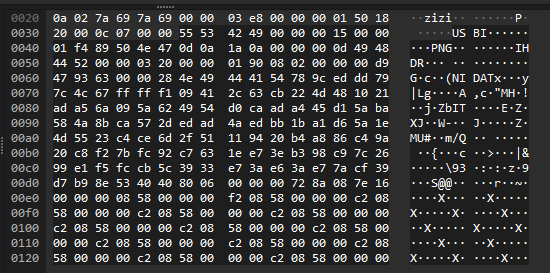
From here, we will the padding before PNG and with tshark create a little script to obtain the image:
5553424900??0015000001f4
Thus, the following command is created:
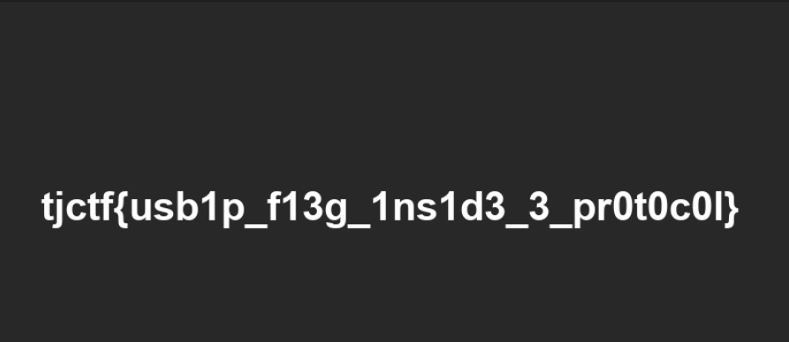
tshark -r chall.pcapng -T fields -e data | grep "5553424900" | sed -E 's/5553424900[0-9a-z]{2}0015000001f4//g' | xxd -r -p > flag.pngBasicly, we get the content of the payload from the tcp packet (also can be done as: -e tcp.payload), filter to the content with the correct padding, delete the padding with some regex formula, and later convert it into a image:
forensics/quant
Now we are getting hotter, only 54 solves, approximately 100 fewer resolutions than the previous ones. This challenge is very curious, a new functionality of images found, furthermore finally, a tool such as zsteg for jpg/jpeg images: jsteg.
For the begging, use the new discovered tool, to get nothing about the image haha:
$> jsteg reveal lost.jpg out
jpeg does not contain hidden data
After some basics scanning we didn’t found nothing interesting, so we dedice to grab a random jpeg image and compare to the actual to identify faster any suspicious hexadecimal pattern.
In a fast way, we conclude the headers of the image were corrupt:
$> xxd goodImage.jpg | head
00000000: ffd8 ffdb 0043 0004 0303 0403 0304 0403  .....C..........
00000010: 0405 0404 0506 0a07 0606 0606 0d09 0a08  ................
00000020: 0a0f 0d10 100f 0d0f 0e11 1318 1411 1217  ................
00000030: 120e 0f15 1c15 1719 191b 1b1b 1014 1d1f  ................
00000040: 1d1a 1f18 1a1b 1aff db00 4301 0405 0506  ..........C.....
00000050: 0506 0c07 070c 1a11 0f11 1a1a 1a1a 1a1a  ................
00000060: 1a1a 1a1a 1a1a 1a1a 1a1a 1a1a 1a1a 1a1a  ................
00000070: 1a1a 1a1a 1a1a 1a1a 1a1a 1a1a 1a1a 1a1a  ................
00000080: 1a1a 1a1a 1a1a 1a1a 1a1a 1a1a ffc0 0011  ................
00000090: 0801 2100 fa03 0122 0002 1101 0311 01ff  ..!...."........

$> xxd lost.jpg | head
00000000: ffd8 ffe0 0010 4a46 4946 0001 0101 0090  ......JFIF......
00000010: 0090 0000 ffdb 0043 0000 0000 0000 0000  .......C........
00000020: 0000 0000 0000 0000 0000 0000 0000 0000  ................
00000030: 0000 0000 0000 0000 0000 0000 0000 0000  ................
00000040: 0000 0000 0000 0000 0000 0000 0000 0000  ................
00000050: 0000 0000 0000 0000 00ff db00 4301 0000  ............C...
00000060: 0000 0000 0000 0000 0000 0000 0000 0000  ................
00000070: 0000 0000 0000 0000 0000 0000 0000 0000  ................
00000080: 0000 0000 0000 0000 0000 0000 0000 0000  ................
00000090: 0000 0000 0000 0000 0000 0000 000c ffc0  ................
In turn of being called magic numbers/headers, it is also called Quantifying Tables, with our prompt engieneering and scripting skills we created the following Quantifying tables changer:
#!/usr/bin/env python3
import sys

LUMA_QT = [
     16, 11, 10, 16, 24,  40,  51,  61,
     12, 12, 14, 19, 26,  58,  60,  55,
     14, 13, 16, 24, 40,  57,  69,  56,
     14, 17, 22, 29, 51,  87,  80,  62,
     18, 22, 37, 56, 68, 109, 103,  77,
     24, 35, 55, 64, 81, 104, 113,  92,
     49, 64, 78, 87,103, 121, 120, 101,
     72, 92, 95, 98,112, 100, 103,  99,
]

CHROMA_QT = [
    17, 18, 24, 47, 99,  99,  99,  99,
    18, 21, 26, 66, 99,  99,  99,  99,
    24, 26, 56, 99, 99,  99,  99,  99,
    47, 66, 99, 99, 99,  99,  99,  99,
    99, 99, 99, 99, 99,  99,  99,  99,
    99, 99, 99, 99, 99,  99,  99,  99,
    99, 99, 99, 99, 99,  99,  99,  99,
    99, 99, 99, 99, 99,  99,  99,  99,
]

def build_dqt_segment(table, tid):
    """Construct a DQT segment for an 8-bit table."""
    # ID byte: (prec=0)<<4 | tid
    header = bytes([0xFF, 0xDB, 0x00, 0x43, tid])
    body = bytes(table)
    return header + body

def patch_qtables(infile, outfile):
    with open(infile, 'rb') as f:
        data = f.read()

    out = bytearray()
    offset = 0

    # 1) Copy up to the first DQT
    idx = data.find(b'\xFF\xDB', offset)
    if idx == -1:
        raise RuntimeError("No encuentro ningún DQT en el JPEG original.")
    out += data[:idx]
    offset = idx

    # 2) Skips all original DQTs
    while True:
        if data[offset:offset+2] != b'\xFF\xDB':
            break
        length = int.from_bytes(data[offset+2:offset+4], 'big')
        offset += 2 + length

    # 3) Insert our tables
    out += build_dqt_segment(LUMA_QT, 0)
    out += build_dqt_segment(CHROMA_QT, 1)

    # 4) Add the rest of the file (from where we skipped the old DQT)
    out += data[offset:]

    # 5) Save the patched JPEG
    with open(outfile, 'wb') as f:
        f.write(out)
    print(f"JPEG corregido escrito en {outfile}")

if __name__ == '__main__':
    if len(sys.argv) != 3:
        print(f"Uso: {sys.argv[0]} input.jpg output.jpg")
        sys.exit(1)
    patch_qtables(sys.argv[1], sys.argv[2])
By applying it, the flag will appear with a low resolution but human redeable:

Anyways, I recommend you read some of this blogs to understand more how jpeg/jpg works and can be able to apply this knownledge in future challenges:
forensics/thats-pietty-cool
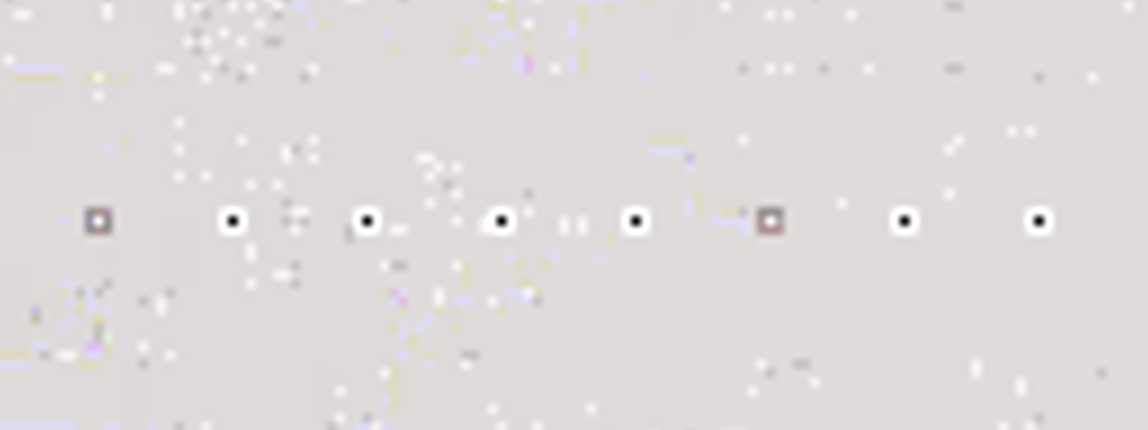
Lower and lower, I love this, for this challenge we have the following image, without any suspicious information that we can take a look:
Are you able to see something? I used to stegoveritas to get a closer look into the image layers, RGB specially, in this case I used it to see better those little dots from the image, this tool in this case, is not necesary.
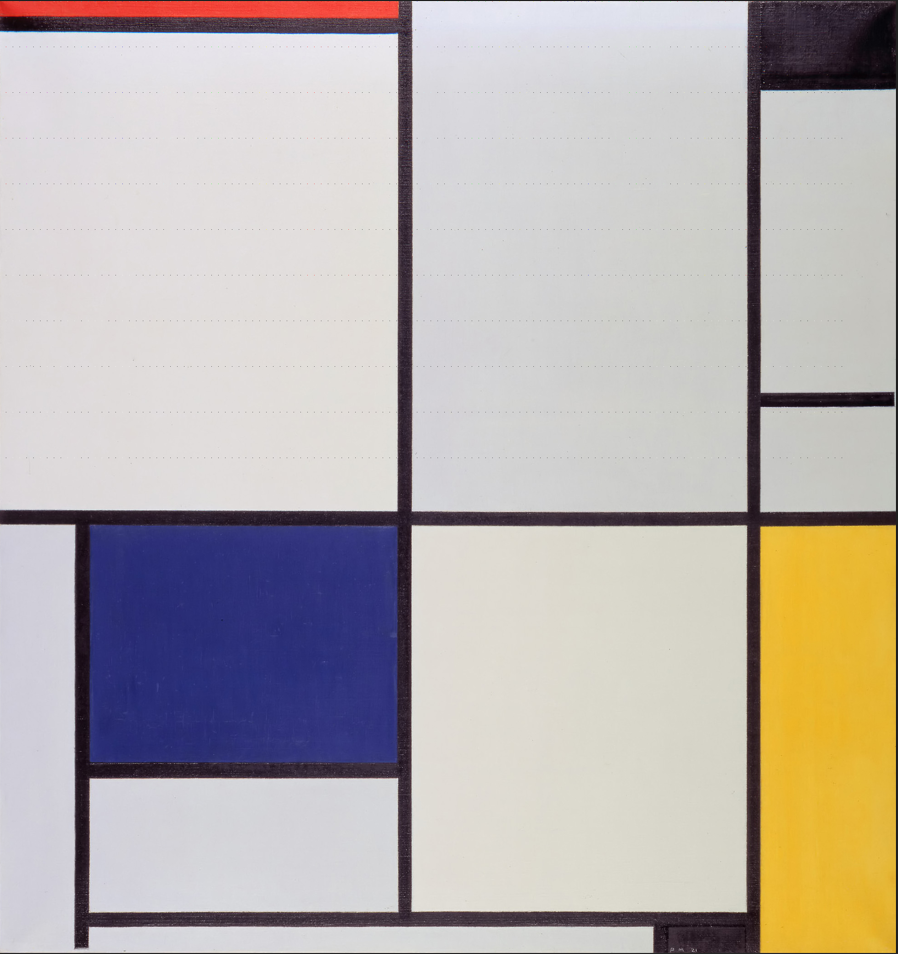
Raw image:
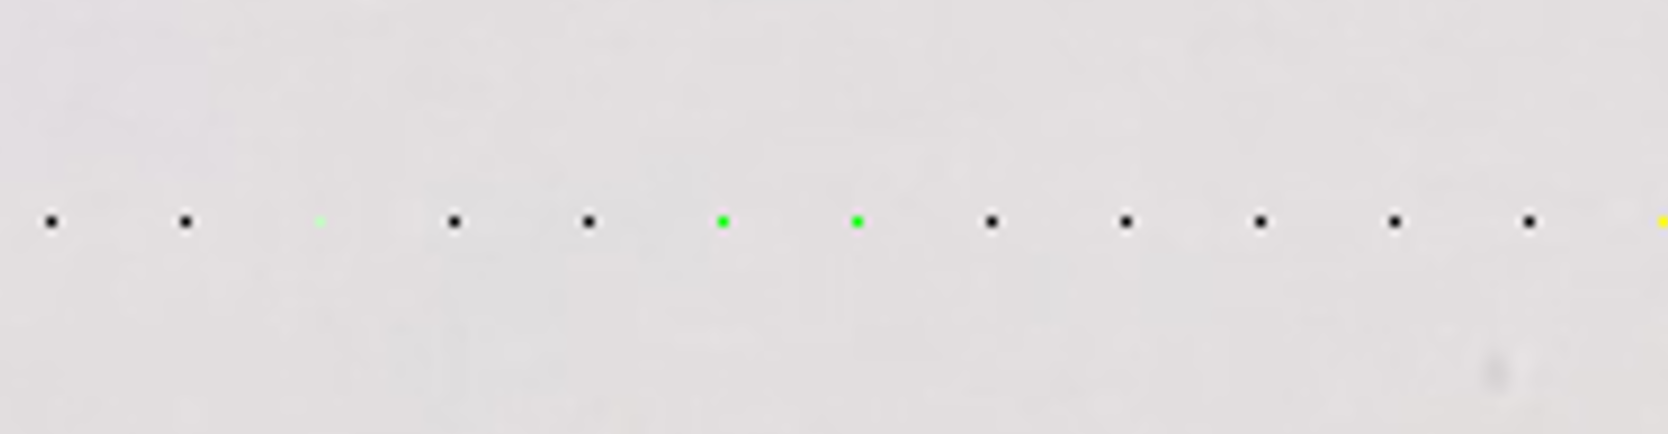
Stegoveritas images:
I wanted to see is that was part of the real image or not, in google I found the real image and not, https://commons.wikimedia.org/wiki/File:Tableau_I,_by_Piet_Mondriaan.jpg, also from a jpg to a png? Interesting…
Taking a closer look, with paint, I calculate the padding of each pixels and where they appear:
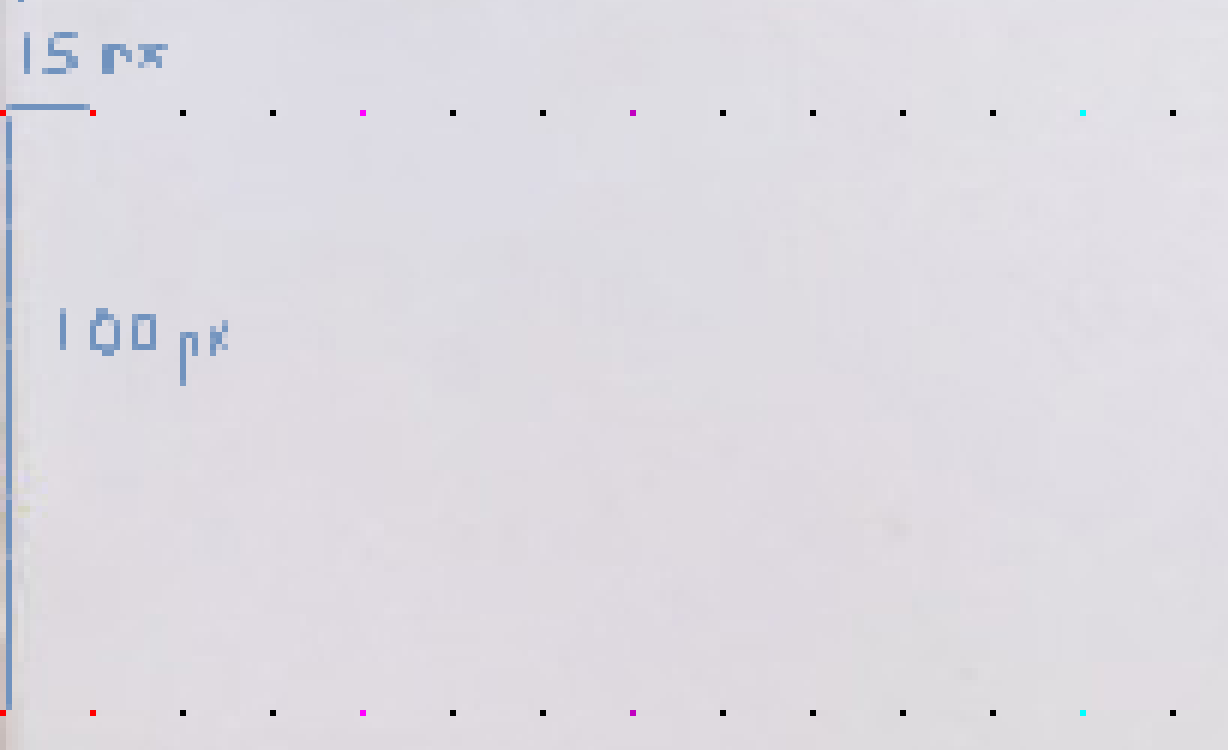
The dotted pixels started in (0,0) in plane xy and stopped in x=1845 and y=1000, being the last pixel: (1845,1000), knowing this I have created the following image extractor:
from PIL import Image, ImageDraw

img = Image.open("runme.png")
pixels = img.load()
width, height = img.size

x_padding = 15
y_padding = 100

pixelArray = []

for y in range(0, height, y_padding):
    if y > 1000:
        break

    row = []
    for x in range(0,width, x_padding):
        if x > 1845:
            break
        row.append(pixels[x, y])

    pixelArray.append(row)

# Creating new image
bigPixel = 50
width = len(pixelArray[0]) * bigPixel
height = len(pixelArray) * bigPixel

img = Image.new("RGB", (width, height), color=(255, 255, 255))
draw = ImageDraw.Draw(img)

for row_idx, row in enumerate(pixelArray):
    for col_idx, color in enumerate(row):
        x0 = col_idx * bigPixel
        y0 = row_idx * bigPixel
        x1 = x0 + bigPixel
        y1 = y0 + bigPixel
        draw.rectangle([x0, y0, x1, y1], fill=color)

img.save("flag.png")
Recieving the image above it started searching how to run an image haha, and I found, with a little help from the challenge name, and esoteric language called: piet

With the following webpage I obtained the flag: https://gabriellesc.github.io/piet/
